分类 CSS 下的文章

IE css hack

IE6 Only
==================
_selector {...}

IE6 & IE7
==================
*html or { _property: }

IE7 Only
==================
*+html or { *property: } - Keep in mind that you have to put the IE7 property first within the same selector.

IE8
==================
.selector/*\**/ { color:#f00; }
**NOTE**: LESS v1.5.0 shoots out an error when compiling the CSS if you use this hack :/


IE8 and IE9 (TOTALLY NOT NEEDED - I LEFT HERE FOR REFERENCE ONLY)
==================
.selector { color:#f00\9; } - http://stackoverflow.com/questions/660652/ie8-css-selector

The above solution doesn't work with font-family, so instead you need to use "\0/ !important"
Example: { font-family:Arial \0/ !important; }            
http://dimox.net/personal-css-hacks-for-ie6-ie7-ie8/

Also, using "\9" is picked up by IE10 and IE11 so you need to redeclare the CSS rules with "-ms-high-contrast:". See info below.

IE9 Only
==================
:root .class/#id { property:value \0/IE9; }
**NOTE**: Prepos v4.0.1 shoots out an error when compiling the CSS if you use this hack :/
http://blog.vervestudios.co/blog/post/2011/05/13/IE9-Only-CSS-Hack.aspx
         
IE10 Only
==================
Method 1: UA Sniffing, which isn't the most loved method to target browsers, but here it is anyway.
http://css-tricks.com/ie-10-specific-styles/

Place this script in the <head>:
<script>
  var doc = document.documentElement;
  doc.setAttribute('data-useragent', navigator.userAgent);
</script>

Usage:
html[data-useragent*='MSIE 10.0'] .selector {...}

Method 2: It used 'Conditional compilation' which is not UA sniffing. Also, it excludes IE11 as well.
http://www.impressivewebs.com/ie10-css-hacks/
Conditional compilation: https://msdn.microsoft.com/en-us/library/8ka90k2e(v=vs.94).aspx

Place this script in the <head>:
<!--[if !IE]><!-->
<script>
  if (/*@cc_on!@*/false && document.documentMode === 10) {
    document.documentElement.className+=' ie10';
  }
</script>
<!--<![endif]-->

Note: Seems the Conditional Comment is not necessary, but I like to include it for good measure.

Usage:
.ie10 .selector {...}

== More info here: https://philipnewcomer.net/2014/04/target-internet-explorer-10-11-css/

IE10 and IE11
==================
@media screen and (-ms-high-contrast: active), (-ms-high-contrast: none) {
    .selector { property:value; }
}

https://gist.github.com/ricardozea/5549389

零CSS3筆記 | @keyframes

类似于flash
只需指明两个状态,之间的过程由计算机自动计算
关键帧的时间单位
数字:0%、25%、100%等
字符:from(0%)、to(100%)

/*必要*/
animation-name        动画名称(关键帧名称)
animation-duration        动画持续时间

/*可選*/
animation-play-state 播放状态( running 播放 和paused 暂停 )
animation-timing-function    动画运动形式
animation-delay            动画延迟
animation-iteration-count        重复次数
infinite为无限次
animation-direction            播放前重置
alternate    动画直接从上一次停止的位置开始执行
normal    动画第二次直接跳到0%的状态开始执行

通过class
在class里加入animation的各种属性
直接给元素加-webkit-animation-xxx样式
animation的问题
没法动态改变目标点位置
obj.addEventListener('webkitAnimationEnd', function (){}, false);

最簡單例子:

AnimationEnd方法封裝:

    function addEnd(obj,fn){
        obj.addEventListener('webkitAnimationEnd',fn,false);
        obj.addEventListener('animationend',fn,false);
    }

See the Pen epNbew by elmok (@elmok) on CodePen.


<script async src="//assets.codepen.io/assets/embed/ei.js"></script>

注意:
1、@keyframes裏,當100%走完後,元素狀態恢復為未走之前,即<style></style>裏設置的狀態!
2、animation: 執行時間 | 動畫名稱 | 運動形式 | 正反序
3、通過將動畫加到class實現點擊會比直接寫好

css3 折紙效果
異常重要的佈局:

<input type="button" value="展开"/>
<div id="wrap">
    <h2>标题</h2>
    <div>
        <span>选项一</span>
        <div>
            <span>选项二</span>
            <div>
                <span>选项三</span>
                <div>
                    <span>选项四</span>
                    <div>
                        <span>选项五</span>
                        <div>
                            <span>选项六</span>
                            <div>
                                <span>选项七</span>
                            </div>
                        </div>
                    </div>
                </div>
            </div>
        </div>
    </div>
</div>

要點:

#wrap{ perspective: 800px; } 

#wrap div{
    transform-style: preserve-3d;     /*每一個div都為一個3d轉換*/
    transform-origin: top;    /*top開始折紙*/
    transform: rotateX(-120deg);    /*初始化先隱藏不同,即折到看不見*/
}

#wrap h2{ z-index:100 } /*設置z-iindex 最高 ,避免被下面div遮蓋*/
var timer = null;
var i = 0
var on = true
inp.onclick = function () {
  inp.style.left = '-200px' //技巧点,點擊時先設置移動
  if (timer) {
    return;
  } //bug,只开不关,所以当不断点击时会出现重复关,如果timer正在执行,return,不往下执行;

  if (on) {
    i = 0; //開始時重置
    timer = setInterval(function () {
      div[i].className = 'show'
      i++;
      if (i == div.length) {
        clearInterval(timer)
        timer = null; //因使用timer作為判斷條件,结束时把定时器置null , 即false;
        inp.style.left = '0'   //執行後再回來
        inp.value = '关闭'
      }
    }, 150)
  } 
  else {
    i = div.length - 1; //開始時重置
    timer = setInterval(function () {
      div[i].className = 'close'
      i--;
      if (i < 0) {
        clearInterval(timer)
        timer = null; //因使用timer作為判斷條件
        inp.style.left = '0'
        inp.value = '展开'
      }
    }, 150)
  }
  on = !on
}

See the Pen YyXBKY by elmok (@elmok) on CodePen.


<script async src="//assets.codepen.io/assets/embed/ei.js"></script>

零css3筆記 | transform 3D | 幻燈片

transform-style(preserve-3d) 建立3D空间
Perspective 景深
Perspective- origin 景深基点
Transform 新增函数
rotateX()
rotateY()
rotateZ()
translateZ()
scaleZ()

最簡單例子:

<div class="box">
    <div></div>
</div>
/*父級*/
.box{
    transform-style: preserve-3d;
    perspective: 800px;
}

/*元素本身*/
.box:hover div{ transform: rotateX(360deg); }
.box div{ transition: 2s; }

一個立方體:

<div>1</div>
<div>2</div>
<div>3</div>
<div>4</div>
<div>5</div>
<div>6</div>

6個面,通過position:absolute;定位,每個transform轉換90deg到相應的面上,注意層次遮擋!

/*父元素定義*/
.box{
    transform-style:preserve-3d;
    perspective:1000px;
    perspective-origin:center;
}
.box div:nth-of-type(1) {
    top: -100px;
    transform-origin: bottom;
    transform: rotateX(90deg);
    z-index: 1
}
.box div:nth-of-type(2) {
    left: -100px;
    transform-origin: right;
    transform: rotateY(-90deg);
    z-index: 2
}
.box div:nth-of-type(3) {
    transform: translateZ(-100px);
    z-index: 3
}
.box div:nth-of-type(4) {
    left: 100px;
    transform-origin: left;
    transform: rotateY(90deg);
    z-index: 2
}
.box div:nth-of-type(5) {
    top: 100px;
    transform-origin: top;
    transform: rotateX(-90deg);
    z-index: 1
}

See the Pen PPqyZx by elmok (@elmok) on CodePen.


<script async src="//assets.codepen.io/assets/embed/ei.js"></script>

从哪个角度看: perspective-origin: right; 多远距离看 perspective: 800px;
从哪个角度看: perspective-origin: right; 必须先设置 perspective后,才有效,
perspective:800可单独设置有效果;

See the Pen YyXRgy by elmok (@elmok) on CodePen.


<script async src="//assets.codepen.io/assets/embed/ei.js"></script>

於是下面的例子可能是成立

創建動態style方法:
(function blue() {
  if (document.all) {
    window.style = '//some css code';
    document.createStyleSheet('javascript:style');
  } else {
    var style = document.createElement('style');
    style.type = 'text/css';
    style.innerHTML = '//some css code';
    document.getElementsByTagName('HEAD').item(0).appendChild(style);
  }
}) ()

See the Pen dYoQQy by elmok (@elmok) on CodePen.


<script async src="//assets.codepen.io/assets/embed/ei.js"></script>

零CSS3筆記 | transition | transform

延遲執行:

transition: 1s width,2s 3s height; /*3s表示延遲3s後執行*/

效果:

ease:(逐渐变慢)默认值
linear:(匀速)
ease-in:(加速)
ease-out:(减速)
ease-in-out:(先加速后减速)
cubic-bezier 贝塞尔曲线( x1, y1, x2, y2 ) http://matthewlein.com/ceaser/

transition结束后执行,函数封装

function addEnd(obj, fn)
{
  obj.addEventListener('WebkitTransitionEnd', fn, false);
  obj.addEventListener('transitionend', fn, false);
}
function removeEnd(obj, fn)
{
  obj.removeEventListener('WebkitTransitionEnd', fn, false);
  obj.removeEventListener('transitionend', fn, false);
}


1、2D變換transform 旋轉 -- rotate

/*以XY軸中心點旋轉*/
.box:hover{-webkit-transform: rotate(360deg)}

/*以X軸中心點旋轉*/
.box:hover{-webkit-transform: rotateX(360deg)}

/*以X軸中心點旋轉*/
.box:hover{-webkit-transform: rotateY(360deg)}

/*自定義位置旋轉,變換旋轉焦點,父元素設定*/
.box{-webkit-transform-origin: 10px 10px;}  /*right top;*/
.box:hover{-webkit-transform: rotate(360deg)}

2、transform斜切 -- skew
注:倾斜函数 必須是block塊才可設置生效

/*沿X軸,即橫向平行四邊行*/
.box:hover{-webkit-transform: skewX(60deg)}

/*沿Y軸,即豎向平行四邊行*/
.box:hover{-webkit-transform: skewY(60deg)}

/*同時設定*/
.box:hover{-webkit-transform: skew(15deg,30deg)}

3、transform縮放 -- scale
注:缩放函数 取值 正数、负数和小数

.box:hover{-webkit-transform: scale(2,3);}

/*
-webkit-transform: scaleX(2);
-webkit-transform: scaleY(3);
*/

4、transform位移 -- translate

-webkit-transform: translate(100px,200px)

/*
-webkit-transform: translateX(100px);
-webkit-transform: translateY(100px);
*/

注意:transform執行順序,後寫的先執行:

.box:hover{-webkit-transform: translateX(100px) scale(0.5)  /*注意,后写的先执行*/}

ex1鐘表:
思路:60條秒鐘線使用li自動生成,一圈360deg,每秒rotate(6deg),時線、分線、秒線分別定位居中,使用-webkit-transform-origin: bottom 使用變換焦點在底部,每隔5分鐘,為一長條,所以選擇器是5n+1;

<div id="wrap">
    <ul id="list">
        
    </ul>
    <div id="hour"></div>
    <div id="min"></div>
    <div id="sec"></div>
    <div class="ico"></div>
</div>
#wrap{width:200px;height:200px;border:2px solid #000;margin:100px auto;border-radius:50%;position:relative}
#wrap ul{margin:0;padding:0;height:200px;position:relative;list-style:none}
#wrap ul li{width:2px;height:6px;background:#000;position:absolute;top:0;left:99px;-webkit-transform-origin:center 100px}
#wrap ul li:nth-of-type(5n+1){width:2px;height:12px}
#hour{width:6px;height:45px;background:#000;position:absolute;left:97px;top:55px;-webkit-transform-origin:bottom}
#min{width:4px;height:65px;background:#999;position:absolute;left:98px;top:35px;-webkit-transform-origin:bottom}
#sec{width:2px;height:85px;background:red;position:absolute;left:99px;top:20px;-webkit-transform-origin:bottom}
.ico{width:20px;height:20px;background:#000;border-radius:50%;position:absolute;left:90px;top:90px}
var wrap = document.getElementById('wrap')
var list = document.getElementById('list')
var css = document.getElementById('css') //給style加id
var hour = document.getElementById('hour')
var min = document.getElementById('min')
var sec = document.getElementById('sec')
var li = ''; //創建li
var ccss = '' // 動態創建css

for (var i = 0; i < 60; i++) {
  li += '<li></li>'
  ccss += '#wrap ul li:nth-of-type(' + (i + 1) + '){-webkit-transform: rotate(' + i * 6 + 'deg);}'   //#wrap ul li:nth-last-of-type(1){-webkit-transform: rotate(0);}
}
list.innerHTML = li;
css.innerHTML += ccss;
toTime()
setInterval(toTime, 1000)
function toTime() {
  var _date = new Date()
  var isec = _date.getSeconds();
  var imin = _date.getMinutes() + isec / 60;
  var ihour = _date.getHours() + imin / 60;
  sec.style.WebkitTransform = 'rotate(' + isec * 6 + 'deg)' //每秒走6deg
  min.style.WebkitTransform = 'rotate(' + imin * 6 + 'deg)' //每分钟走6deg
  hour.style.WebkitTransform = 'rotate(' + ihour * 30 + 'deg)' //每小时走30deg
}

4、transform矩阵函数 -- matrix

/*未完,待更*/

matrix(a,b,c,d,e,f)
a    c    e        x        ax    cy    e
b    d    f    *   y    =   bx    dy    f
0    0    1                 0     0     1

所以,變換後水平座標: ax + cy + e
          垂直座標: bx + dy + f

默認下公式 :  transform: matrix( scaleX(),0,0,scaleY(),translateX(),translateY() );

縮放:scale
x轴缩放 a=x*a    c=x*c     e=x*e;
y轴缩放 b=y*b   d=y*d     f=y*f;

位移:translate()
x轴位移: e=e+x
y轴位移: f=f+y

旋轉:rotate():
matrix(cosθ,sinθ,-sinθ,cosθ,0,0)

斜切:skew():
matrix(1,tan(θy),tan(θx),1,0,0)
x轴倾斜: c=Math.tan(xDeg/180*Math.PI)
y轴倾斜: b=Math.tan(yDeg/180*Math.PI)

matrix(a,b,c,d,e,f) 矩阵函数
通过矩阵实现旋转
a=Math.cos(deg/180*Math.PI); 
b=Math.sin(deg/180*Math.PI);
c=-Math.sin(deg/180*Math.PI);
d=Math.cos(deg/180*Math.PI);
变换兼容IE9以下IE版本只能通过矩阵来实现
filter: progid:DXImageTransform.Microsoft.Matrix( M11= 1, M12= 0, M21= 0 , M22=1,SizingMethod='auto expand');
IE下的矩阵没有E和F两个参数 M11==a; M12==c; M21==b; M22==d

CSS3扇形導航

See the Pen WQbqeR by elmok (@elmok) on CodePen.


<script async src="//assets.codepen.io/assets/embed/ei.js"></script>

零CSS3筆記 | 盒模型

伸缩盒模型flex【新】
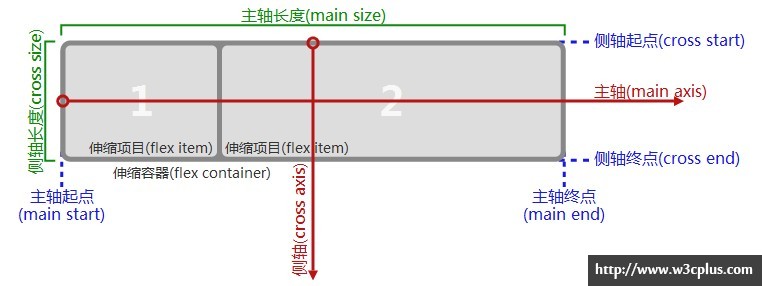
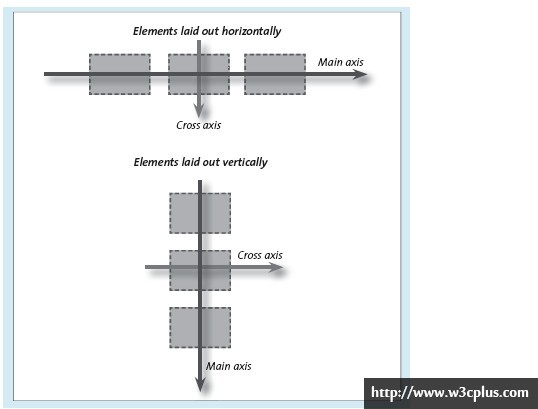
搞清主軸、側軸

主轴的方向主要是用来确定flex的主方向,所以你子元素要么放置在一行,要么放置在一列。侧轴主要垂直于主轴运行,如下图所示:

1、flex-grow:定義擴展比率,默認0,不允許負值

.ul1{width:900px}

/*子元素*/
.ul1 li:nth-child(1){width:200px}
.ul1 li:nth-child(2){-webkit-flex-grow:1;width:50px}
.ul1 li:nth-child(3){-webkit-flex-grow:3;width:50px}

/*計算方法
剩餘空間:900-200-50-50 = 600
分4份:600/4 = 150
1、200 + 600/4 * 0 = 200
2、50 + 600/4 * 1 = 200
3、50 + 600/4 * 3 = 500 
*/

2、flex-shrink:定義收縮比率,默認1,不允許負值

.ul2{width:400px}

/*子元素*/
.ul2 li:nth-child(1){width:200px}
.ul2 li:nth-child(2){width:200px;flex-shrink:3}
.ul2 li:nth-child(3){width:200px;flex-shrink:1}

/*計算方法
超出空間:400-200-200-200 = 200
分5份:200/5 = 40
1、200 - 40 * 1 = 160
2、200 - 40 * 3 = 80
3、200 - 40 * 1 = 160
*/

3、flex-basis:定義基準伸縮剩餘空間,默認auto

/* 當flex-grow:0;flex-shrink:1;時,flex-basis = max-width */

.ul3{width:400px}
.ul3 li{width:200px}

/*子元素*/
.ul3 li:nth-child(3){flex-basis:600px}

/*計算方法
li總空間:200+200+600 = 1000  即把flex-basis = width
所以比率為:200/1000、200/1000、600/1000
1、400 * 0.2 = 80
2、400 * 0.2 = 80
3、400 * 0.6 = 240
*/

/* 當 flex-shrink != 1 ,待續*/
flex:none | <' flex-grow '> <' flex-shrink >'? || <' flex-basis '>
4、flex-direction:定義書寫模式,默認row flex-direction:row | row-reverse | column | column-reverse flex-direction: 左對齊 | 右對齊 | 頂對齊 | 底對齊
/*父元素設置*/
.ul4{flex-direction: row;}

/*
    1 2 3  row          3 2 1 row-reverse

    1                   3
    2                   2
    3                   1
    column              column-reverse
*/

5、flex-wrap:控制flex容器單行或多行,默認nowrap
flex-wrap:nowrap | wrap | wrap-reverse

/*父元素設置*/
.ul5{width:220px;flex-wrap:wrap}

.ul5 li{width:100px;height:100px}
flex-flow:<' flex-direction '> || <' flex-wrap '>

6、align-content:控制子元素在flex容器中的位置,多行,左右上下居中;默認stretch

如:flex-start各行向flex容器的超始位置堆疊,第一行緊靠側軸,第二行堅靠前一行;

align-content:flex-start | flex-end | center | space-between | space-around | stretch

/*父元素設置*/

.ul6{-webkit-flex-flow: row wrap;} /*演示多行*/

.ul6.flex-start{-webkit-align-content: flex-start} /*第一行側軸 靠 父級側軸起始邊界*/
.ul6.flex-end{-webkit-align-content: flex-end}/*最尾行側軸,靠 父級側軸結束邊界*/
.ul6.center{-webkit-align-content: center}/**/
.ul6.space-between{-webkit-align-content: space-between} /*第一行=flex-start 尾行=flex-end*/
.ul6.space-around{-webkit-align-content: space-around} /*兩行兩兩間空間相等*/
.ul6.stretch{-webkit-align-content: stretch}/**/

7、align-items:控制子元素在flex容器中的位置,調整伸縮項目在側軸的對齊方式;;默認stretch;
如: flex-start 弹性盒子元素的侧轴(纵轴)起始位置的边界紧靠住该行的侧轴起始边界。
align-items:flex-start | flex-end | center | baseline | stretch

/*父元素設置*/
.ul7{-webkit-flex-flow:row wrap}

.ul7.flex-start{-webkit-align-items:flex-start;align-items:flex-start}
.ul7.flex-end{-webkit-align-items:flex-end;align-items:flex-end}
.ul7.center{-webkit-align-items:center;align-items:center}
.ul7.baseline{-webkit-align-items:baseline;align-items:center}
.ul7.stretch{-webkit-align-items:stretch;align-items:stretch}
align-content與align-items相似,但有區別
align-content:對齊伸縮行;
align-items:對齊伸縮項目
如:當=flex-start/flex-end/center,有多行時,align-content行與行之間無間隙,而align-items行與行之間均分flex容器的高!

8、justify-content:一般為向行調整,設置伸縮項目沿主軸的對齊方式,調整項目之間的間距。
---在主軸方向上設置任何margin都不會生效
justify-content:flex-start | flex-end | center | space-between | space-around

/*父元素設置*/

.ul9.flex-start{justify-content:flex-start} /*左對齊*/
.ul9.center{justify-content:center} /*居中對齊*/
.ul9.space-between{justify-content:space-between}  /*兩端對齊*/
.ul9.space-around{justify-content:space-around}  /*兩端對齊基礎上左右兩邊會有一半間隙縮進 */

9、order:用整数值来定义排列顺序,数值小的排在前面。可以为负值。

/*子元素*/
.ul10 li:nth-child(1){order: 4}
.ul10 li:nth-child(3){order: -1}
.ul10 li:nth-child(1){order: 2}

10、可能較少用~align-self默認值为「auto」,則计算值为父元素的 <' align-items '> 值,否则为指定值。
align-self:auto | flex-start | flex-end | center | baseline | stretch

/*子元素*/
.ul8.flex-end li{-webkit-align-self:flex-end;align-self:flex-end}
.ul8.center li{-webkit-align-self:center;align-self:center}

See the Pen VvYyvp by elmok (@elmok) on CodePen.


<script async src="//assets.codepen.io/assets/embed/ei.js"></script>


以下佈局都須在父元素display:box 或 display:inline-box
1)彈性盒模型-佈局方向-子元素設置

Box-orient 定义盒模型的布局方向
:Horizontal 水平显示 //默認可不寫
:vertical 垂直方向
box-direction 元素排列顺序
:Normal 正
:Reverse 反
box-ordinal-group 设置元素的具体位置

/*I:父元素設置*/
.box{
    display:-webkit-box;
}
/*II:以下子元素設置*/
.box div{
    -webkit-box-orient:Horizontal /*水平默認可不寫*/
}

.box div:nth-of-type(1){
    -webkit-box-ordinal-group: 2 /*第1塊元素排第二位置*/
}

2)彈性盒模型-空間管理,子元素設置Box-flex ,即寬度width設置,加宽度:-固定宽度后再平分

/*I:父元素設置*/
.box{
    display:-webkit-box;
}
/*II:以下子元素設置*/
.box div:nth-of-type(1){
    -webkit-box-flex: 2; /*表示第1塊元素寬度點總寬的2份*/
}

3) 彈性盒模型-對齊,父元素設置box-pack,可理解為子元素左對齊,右對齊,居中,兩端對齊,
Start 子元素左
End 子元素右
Center 子元素居中
Justify 兩端對齊
相對應:
父元素設置 box-align,頂部Start 底部End 居中Center

另:未知宽度垂直居中: html{height:100%}body{height:100%}box{height:100%}

/*父元素*/
.box{
    -webkit-box-pack:Center;-webkit-box-align: center
}

<pre>.box,.box2,.box3{ font-size: 20px; text-align: center; color: #ffffff;height: 200px;border: 10px solid #000; padding: 10px;
display:-webkit-box;}
.box div,.box2 div,.box3 div{ width: 100px; height: 100px; background: peru;border:1px solid #ffffff}

.box div:nth-of-type(1){-webkit-box-ordinal-group: 2}
.box div:nth-of-type(2){-webkit-box-ordinal-group: 4}
.box div:nth-of-type(3){-webkit-box-ordinal-group: 2}
.box div:nth-of-type(4){-webkit-box-ordinal-group: 5}
.box div:nth-of-type(5){-webkit-box-ordinal-group: 1}
/寬度設置/
.box2 div:nth-of-type(1){width: 300px;}
.box2 div:nth-of-type(2){-webkit-box-flex: 1;}
.box2 div:nth-of-type(3){-webkit-box-flex: 3;}
.box2 div:nth-of-type(4){-webkit-box-flex: 4;}
.box2 div:nth-of-type(5){-webkit-box-flex: 5;}
/子元素 左對齊,右對齊,居中,兩端對齊/
.box3{ -webkit-box-pack:Center;-webkit-box-align: center }
</pre>

See the Pen YyKmPY by elmok (@elmok) on CodePen.


<script async src="//assets.codepen.io/assets/embed/ei.js"></script>


伸缩盒模型【旧】


See the Pen zvYMNX by elmok (@elmok) on CodePen.


<script async src="//assets.codepen.io/assets/embed/ei.js"></script>


盒模型陰影

box-shadow:[inset] x y blur [spread] color

盒模型倒影--只支持webkit below above left right

box-reflect direction 方向

    img { display: block; 
-webkit-box-reflect: below 5px 
-webkit-linear-gradient(right, rgba(0, 0, 0, 1) 0%, rgba(0, 0, 0, 0) 100%); 
}

resize 自由缩放

Both 水平垂直都缩放
Horizontal 只水平方向缩放
Vertical 只垂直方向缩放
注意:一定要配合overflow:auto 一块使用只有水平方向可以缩放

.box{ width: 100px; height: 100px; border: 5px solid #000;background: url("../c2.jpg");
    resize: both; 
    overflow: auto; 
}

box-sizing:content-box | border-box
Content-box 标准盒模型 width/height=border+padding+content
Border-box 怪异盒模型 width/height=content


父元素設置column,:

column-width 宽度 column-count 列数 column-gap 距离 column-rule 栏目间隔线
<div class="wrap">
    <p>中国看不起说大话的人。而在我看来大话并无甚,好比古代妇女缠惯了小脚,碰上正常的脚就称“大脚”;中国人说惯了“小话”,碰上正常的话,理所当然就叫“大话”了。</p>
    <p>敢说大话的人得不到好下场,吓得后人从不说大话变成不说话。幸亏胡适病死了,否则看到这情景也会气死。结果不说大话的人被社会接受了。</p>
</div>
.wrap{width:900px;border:1px solid #000;font:14px/28px '宋体';color:#000;text-indent:2em;-webkit-column-count:4;//分為四欄
-webkit-column-gap:20px;//每欄間距為20px,即padding
-webkit-column-rule:1px solid peru;//欄線顏色粗細
-moz-column-count:4;-mox-column-gap:20px;-moz-column-rule:1px solid peru}

See the Pen avvyLo by elmok (@elmok) on CodePen.


<script async src="//assets.codepen.io/assets/embed/ei.js"></script>

.box{ columns:200px 3; }

/*或*/

.box{ columns:200px; }

零CSS3筆記 | html5

placeholder 自定義樣式

/* 通用 */
::-webkit-input-placeholder { color:#f00; }
::-moz-placeholder { color:#f00; } /* firefox 19+ */
:-ms-input-placeholder { color:#f00; } /* ie */
input:-moz-placeholder { color:#f00; }

/* webkit专用 */
#field2::-webkit-input-placeholder { color:#00f; }
#field3::-webkit-input-placeholder { color:#090; background:lightgreen; text-transform:uppercase; }
#field4::-webkit-input-placeholder { font-style:italic; text-decoration:overline; letter-spacing:3px; color:#999; }

/* mozilla专用 */
#field2::-moz-placeholder { color:#00f; }
#field3::-moz-placeholder { color:#090; background:lightgreen; text-transform:uppercase; }
#field4::-moz-placeholder { font-style:italic; text-decoration:overline; letter-spacing:3px; color:#999; }

零CSS3筆記 | UI

圆角
border-radius:左上 右上 右下 左下
border-radius: x軸/y軸
border-radius: 10px 20px 30px 40px / 10px 30px 40px 80px;

<pre>.box-p{width: 90px;transition: 2s linear;}
.box{width: 40px;height: 40px;background:green;display:inline-block}
.box:nth-of-type(1){border-radius: 0 50%}
.box:nth-of-type(2){border-radius: 50% 0 }
.box:nth-of-type(3){border-radius: 50% 0}
.box:nth-of-type(4){border-radius: 0 50%}
.box-p:hover{-webkit-transform:rotate(360deg)}
</pre>

See the Pen KdKPEQ by elmok (@elmok) on CodePen.


<script async src="//assets.codepen.io/assets/embed/ei.js"></script>


邊框圖片border-image:url 四邊切割大小 排列方式

border-image-sourceg 引入图片

border-image-slice 切割图片

border-image-width 边框宽度

border-image-repeat 图片的排列方式

边框颜色 border-colors

<pre>.box{width: 100px;height: 100px;
border-image:url('http://elmok.com/img/border-img.jpg';) 27 27 27 27 round round;
/27表示切割被引用圖片四邊的距離,類似於padding/
/以下中間部填充只有webkit實現/
-webkit-border-image:url('http://elmok.com/img/border-img.jpg';) 27 27 27 27 round round;
border-width:20px;
}
.box2{width: 100px;height: 100px;
border:10px solid #166994;
-moz-border-left-colors:saddlebrown yellow ;
}
</pre>

See the Pen avborx by elmok (@elmok) on CodePen.


<script async src="//assets.codepen.io/assets/embed/ei.js"></script>


線性漸變
线性渐变格式:linear-gradient([<起点> || <角度>,]? <点>, <点>…)

重覆平鋪:repeating-linear-gradient

加入点的位置

top, red 40%, green 60%

top, red 50%, green 50%

同一个位置两个点——直接跳变

也可以用px

配合rgba

top, rgba(255,255,255,1), rgba(255,255,255,0)

加入背景图片

background: -webkit-linear-gradient (top, rgba(255,255,255,1) 30%, rgba(255,255,255,0)), url(a.gif)

/*写法一:注意标点*/
background-image:-webkit-linear-gradient(left top,red blue)
/*写法二:*/
background-image:-webkit-linear-gradient(30deg,red,blue,yellow...)
/*写法三:*/
background-image:-webkit-linear-gradient(top,red 0,blue 100%);
/*写法四:重复平铺*/
background-image:-webkit-repeating-linear-gradient(top,red 0,blue 30px);
/*条纹背景:*/
background: -webkit-repeating-linear-gradient(left,green 0,green 10px,#ffffff 10px,#fff 20px);
/*簡單寫*/
.box{ width: 200px; height: 200px;
     background: -webkit-linear-gradient(red,blue);
     background: -moz-linear-gradient(red,blue);
     background: -o-linear-gradient(red,blue);
     background: -ms-linear-gradient(red,blue);
filter:progid:DXImageTransform.Microsoft.gradient(startColorstr='red',endColorstr='blue',GradientType='0'); /* 1,左-右 0 上-下 */
    }

<pre>.box{width: 300px;height: 40px;text-align: center;color: #fff;line-height: 40px;
/定義光暈/
background:
-webkit-linear-gradient(-45deg,
rgba(255,255,255,0) 0,
rgba(255,255,255,0.4) 155px,
rgba(255,255,255,0.9) 158px,
rgba(255,255,255,0.5) 160px,
rgba(255,255,255,0) 170px)
no-repeat -300px,
#000;
transition: 2s
}
/ 两个背景,gradient及url背景 /
.box:hover{background-position: 300px 0,0 0 ;}
</pre>

See the Pen vNYBoL by elmok (@elmok) on CodePen.


<script async src="//assets.codepen.io/assets/embed/ei.js"></script>


径向渐变:radial-gradient([<起点>]? [<形状> || <大小>,]? <点>, <点>…);

radial-gradient([<起点>]? [<形状> || <大小>,]? <点>, <点>…);

起点:可以是关键字(left,top,right,bottom),具体数值或百分比

形状: ellipse、circle

大小 :具体数值或百分比,也可以是关键字(最近端,最近角,最远端,最远角,包含或覆盖 (closest-side, closest-corner, farthest-side, farthest-corner, contain or cover));

注意firefox目前只支持关键字

<pre>.box{width:200px;height:200px;border:1px solid #000;float:left;margin:10px}
.box:nth-of-type(1){background:-webkit-radial-gradient(100px 50px,closest-side,#fff ,#000)}
.box:nth-of-type(2){background:-webkit-radial-gradient(100px 50px,closest-corner,#fff ,#000)}
.box:nth-of-type(3){background:-webkit-radial-gradient(100px 50px,farthest-side,#fff ,#000)}
.box:nth-of-type(4){background:-webkit-radial-gradient(100px 50px,farthest-corner,#fff ,#000)}
.box:nth-of-type(5){background:-webkit-radial-gradient(100px 50px,contain,#fff ,#000)}
.box:nth-of-type(6){background:-webkit-radial-gradient(100px 50px,cover,#fff ,#000)}
</pre>

See the Pen LpYYEY by elmok (@elmok) on CodePen.


<script async src="//assets.codepen.io/assets/embed/ei.js"></script>


多背景,逗號分開:background: url(a.jpg) 0 0, url(b.jpg) 0 100%;

背景尺寸: background-size:x y

background-size:100% 100%

Cover 放大

Contain 缩小

<pre>.box{width: 400px;height: 100px;border:10px solid #000;
background:
url('http://elmok.com/img/bgcov1.png';) no-repeat,
url('http://elmok.com/img/bgcov2.png';) no-repeat 0 bottom
}
.box2,.box3,.box4{margin-top: 10px;width: 400px;height: 50px;border:10px solid #000;
background:url('http://elmok.com/img/bgcov1.png';) no-repeat;}
.box2{background-size:100% 100%}
.box3{background-size:cover}
.box4{background-size:contain}
</pre>

See the Pen BoaaNd by elmok (@elmok) on CodePen.


<script async src="//assets.codepen.io/assets/embed/ei.js"></script>


background-origin : border | padding | content

從下面的值開始顯示完整圖片,但無論border,還是padding都會顯示背景,所以需要background-clip;

border-box: 从border区域开始显示背景。

padding-box: 从padding区域开始显示背景。

content-box: 从content区域开始显示背景。

background-clip

border: 从border区域向外裁剪背景。

padding: 从padding区域向外裁剪背景。

content: 从content区域向外裁剪背景。

no-clip: 从border区域向外裁剪背景。

配合:-webkit-background-clip:text; background-position,可做出webkit獨有效果

<pre>.box{width: 300px;height: 300px;display:inline-block;
background:url('http://elmok.com/img/h5.jpg';);
border:30px solid rgba(0,0,0,.7);
background-origin: padding-box;
background-clip:padding-box
}

.box1{width: 300px;height: 300px;display:inline-block;
background:url('http://elmok.com/img/h5.jpg';);
/webkit獨有/
font: bold 80px/100px '微软雅黑'; text-align: center; color: rgba(0,0,0,0);
-webkit-background-clip:text;
}
.box1:hover{
background-position: -300px -300px;}
</pre>

See the Pen meddrR by elmok (@elmok) on CodePen.


<script async src="//assets.codepen.io/assets/embed/ei.js"></script>
1)先做光暈,background:background: -webkit-linear-gradient(-30deg,rgba(255,255,255,0) 100px,rgba(255,255,255,1) 150px,rgba(255,255,255,1) 150px,rgba(255,255,255,1) 200px,rgba(255,255,255,1) 240px,rgba(255,255,255,0) 300px) no-repeat -300px 0;

2)利用webkit支持-webkit-background-clip: text;/ 只有文字有背景/

3)使用background-position 滑動;
<pre>body{background:#000;text-align:center;font-size:50px;line-height:200px}
h1{background:-webkit-linear-gradient(-30deg,rgba(255,255,255,0) 100px,rgba(255,255,255,1) 150px,rgba(255,255,255,1) 150px,rgba(255,255,255,1) 200px,rgba(255,255,255,1) 240px,rgba(255,255,255,0) 300px) no-repeat -300px 0;color:rgba(255,255,255,.5);-webkit-background-clip:text}
h1:hover{background-position:1000px 0}
</pre>

See the Pen jbOOVp by elmok (@elmok) on CodePen.


<script async src="//assets.codepen.io/assets/embed/ei.js"></script>


遮罩,也只有webkit實現

Mask-image

Mask-position

Mask-repeat

实例:特殊形状的幻灯片效果
<pre>.box{width: 600px;height: 300px;background:url('http://elmok.com/img/h1.jpg';);border:1px solid #000;
-webkit-mask: url('http://elmok.com/img/mask.png';) no-repeat center;
transition:1s;
}
.box:hover{-webkit-mask-position: 100% 50%}
</pre>

See the Pen WQNNpJ by elmok (@elmok) on CodePen.


<script async src="//assets.codepen.io/assets/embed/ei.js"></script>

零CSS3筆記 | @media

@media 设备名 only (选取条件) not (选取条件) and(设备选取条件),设备二{sRules}

max-width:800px 最大寬度為800px 即800px以下生效

min-width:800px 最小寬度為800px 即800px以上生效

(min-width:400px) and (max-width:800px) 400-800之間

min-width时,小的放上面大的在下面,同理如果是用max-width那么就是大的在上面,小的在下面

<link rel="stylesheet" href="css3-2.css" media="screen and (min-width:400px) and (max-width:800px)"/>

@media screen and (min-width: 600px) and (max-width: 900px){
    something....
}

@media all and (orientation:portrait){ /*豎屏,即高>寬*/
    something....
}

@media all and (orientation:landscape){ /*橫屏,即高<寬*/
    something....
}

@media all and (orientation:landscape){ /*橫屏,即高<寬*/
    something....
}
<meta name="viewport" content="user-scalable=no, width=device-width, initial-scale=1.0, maximum-scale=1.0" />
/*大致初始化*/
/* 禁用iPhone中Safari的字号自动调整 */
html {
    -webkit-text-size-adjust: none;
}
/* 设置HTML5元素为块 */
article, aside, details, figcaption, figure, footer, header, hgroup, menu, nav, section {
    display: block;
}
/* 设置图片视频等自适应调整 */
img {
    max-width: 100%;
    height: auto;
    width: auto\9; /* ie8 */
}
.video embed, .video object, .video iframe {
    width: 100%;
    height: auto;
}
@media (device-height:568px) and (-webkit-min-device-pixel-ratio:2){/* 兼容iphone5 */}
@media only screen and (max-device-width :480px){ }
@media only screen and (min-device-width :481px){ }

/*6*/
@media (min-device-width : 375px) and (max-device-width : 667px) and (-webkit-min-device-pixel-ratio : 2){ }

/*6+*/
@media (min-device-width : 414px) and (max-device-width : 736px) and (-webkit-min-device-pixel-ratio : 3){ }

/*魅族*/
@media only screen and (min-device-width :1080px) and (-webkit-min-device-pixel-ratio : 2.5){ }

/*mate7*/
@media only screen and (min-device-width :1080px) and (-webkit-min-device-pixel-ratio : 3){ }

/*4 4s*/
@media only screen and (device-height :480px) and (-webkit-device-pixel-ratio:2){ }

零CSS3筆記 | 屬性操作

属性选择器[IE7+]
E[attr]
E[type="text"]
E[attr~="value"]以空格隔开,其中词列表中包含了一个value词
E[attr^="value"]以value开头
E[attr$="value"]以value结束的
E[attr*="value"]包含了value
E[attr|="value"]value或以“value-”开头的值(比如说zh-cn)


结构性伪类

of-type,关注以标签计算;

child,关注凡有子节点即计算,有&&的意思,缺一不成立;

E:nth-child(n) E的父元素中的第n个字节点,并且标签必须=E

p:nth-child(odd) 奇数

p:nth-child(even) 偶数

p:nth-child(2n)

E:nth-last-child(n) E的父元素中的第n个字节点,倒数计算


E:nth-of-type(n) E的父元素中的第n个字节点,只算类型E

E:nth-last-of-type(n) E父元素中的第n个字节点,只算类型E,倒数计算

E:empty E元素中没有子节点。注意:子节点包含文本节点

:first-child == :nth-child(1) IE9+
:last-child == :nth-last-child(1) IE9+
:first-of-type == :nth-of-type(1) IE9+
:last-of-type == :nth-last-of-type(1) IE9+

p:nth-of-type(2) 找到P标签父级下的第2个P标签 可能这种更靠谱
p:nth-last-of-type(2) 找到P标签父级下的倒数第2个P标签 可能这种更靠谱
p:empty 只要有东西即不成立,无论任何东西

p:only-child -->匹配那些是其父元素唯一孩子的 E 元素;IE9+
p:only-of-type -->根据 p 的类型,匹配那些在其兄弟里是唯一此类元素的 p 元素。IE9+

<div class='box1'>
<div>
<p>我是p,父级下只有我一个孩子,所以 only-child 及 only-of-type 都选中我</p>
</div>

<div>
<span>我是妹妹span</span>
<p>我是p,父级下只有妹妹span,没有别的哥哥弟弟p,但是也只有 only-of-type选中我;而only-child有妹妹span所以选不中</p>
</div>

<div>
<p>我是p,我有好多兄弟,所有我不能被选中</p>
</div>
</div>
.box1 p:only-child{background:green;color: #fff;}
.box1 p:only-of-type{background:peru;color: #fff;}

E:target 表示当前的URL片段的元素类型,这个元素必须是E
E:disabled 不可点击时的样式
E:enabled 可点击的样式
E:checked 已选中的checkbox或radio
E:first-line E元素中的第一行
E:first-letter E元素中的第一个字符
E::selection E元素在用户选中文字时
E::before 生成内容在E元素前
E:not(s) E元素不被匹配如 p:not(.tab) //不匹配带有class='tab'的元素
E~F表示E元素毗邻的F元素
Content 属性

<pre>#div1,#div2{width: 100px;height: 100px;background:red;display: none;}

div1:target,#div2:target{display: block;}

input:enabled{background:pink}
input:disabled{background:peru}
input:checked{width: 20px;height: 20px;}

label{ float: left; margin: 0 5px; overflow: hidden; position: relative;}
label input{ position: absolute; left: -50px; top: -50px;}
span{ float: left; width: 20px; height: 20px;border:1px solid #000;}
input:checked ~span{background:green}

p~h2{background:#f90}

.box p:first-line{background:#cdcd00}
.box p:first-letter{font-size: 30px;}

.box2 p::selection{background:darkmagenta; color:#fff;}

.box3:before{content:'before的内容';border:3px solid #000;padding-left: 10px;padding-right: 10px;}
.box3:after{content:'after的内容';border:3px solid #000;padding-left: 10px;padding-right: 10px;}

</pre>

See the Pen WQeqBP by elmok (@elmok) on CodePen.


<script async src="//assets.codepen.io/assets/embed/ei.js"></script>


文本屬性

顏色模式:rgba(),应用:背景透明,颜色不透明,反向,边框透明,有bug;

文字陰影:text-shadow:x y blur color...

文字搭邊:-webkit-text-stroke:宽度 颜色 ,只支持webkit

Direction 定义文字排列方式(全兼容) 注意要配合unicode-bidi 一块使用

Text-overflow 定义省略文本的处理方式 clip 无省略号 Ellipsis 省略号 (注意配合overflow:hidden和white-space:nowrap一块使用)

p{
direction: rtl;        /*文字從右到左*/
unicode-bidi: bidi-override

/*文字超出點點省略*/
p{
white-space: nowrap;
overflow: hidden;
text-overflow: ellipsis
}

自定義字體: @font-face
http://www.fontsquirrel.com/fontface/generator

    @font-face {
        font-family: 'chalk_marksregular';
        src: url('../font/chalkmars-webfont.eot');
        src: url('../font/chalkmars-webfont.eot?#iefix') format('embedded-opentype'),
        url('../font/chalkmars-webfont.woff2') format('woff2'),
        url('../font/chalkmars-webfont.woff') format('woff'),
        url('../font/chalkmars-webfont.ttf') format('truetype'),
        url('../font/chalkmars-webfont.svg#chalk_marksregular') format('svg');
        font-weight: normal;
        font-style: normal;
    }
    p{ font-family: 'chalk_marksregular'; font-size: 100px;transition: 1s}
    p:hover{ color: #f90;}


常用css3-持續更新-非深入

例子仅限于chrome

<div class="box"></div>
.box{width:100px;transition:1s width ease;}
.box:hover{width:300px;}


<style>
.box{width:100px;height:100px;background:#467B96;transition:1s width ease;}
.box:hover{width:300px;}
</style>

.box{-webkit-linear-gradient(top left,red 0%,yellow 100%)}


<style>
.box1{width:100px;height:100px;background: -webkit-linear-gradient(top left,red 0%,yellow 100%) ;transition:1s width ease;}
</style>


倒影:box-reflect: above | below | left | right

box-reflect:[倒影方向] [倒影距離] [倒影透明漸變]

-webkit-box-reflect: below 5px -webkit-linear-gradient(top,rgba(255,255,255,0) 0%,rgba(255,255,255,0.6) 100%);


<style>
.box2{width:100px;height:100px;background:#467B96;
-webkit-box-reflect: below 5px -webkit-linear-gradient(top,rgba(255,255,255,0) 0%,rgba(255,255,255,0.6) 100%);}
</style>


transform:rotate(0deg)

.img1{-webkit-transform: rotate(30deg);
        -webkit-transition:1s ease all;}
.img1:hover{-webkit-transform: rotate(360deg); }


<style>
.img1{width:200px;-webkit-transform: rotate(30deg);

    -webkit-transition:1s ease all;}

.img1:hover{-webkit-transform: rotate(360deg); }
</style>


transform:rotateY(0deg)

.img2{-webkit-transform: rotate(0deg);
        -webkit-transition:1s ease all;}
.img2:hover{-webkit-transform: rotateY(360deg); 


<style>
.img2{width:200px;-webkit-transform: rotate(0deg);

    -webkit-transition:1s ease all;}

.img2:hover{-webkit-transform: rotateY(360deg); }
</style>


顯示器中3D效果元素的透視點在顯示器上方(不是後面)perspective屬性,元素父級設置,如大小為1000px,即眼睛離顯示器的距離,子元素會有透視效果,不是元素本身
用戶元素3D空間Z平面之間的距離,其效應由其他值決定,值越小,用戶與3D空間Z平面越近,視覺效果深刻,反之越遠,視覺小

perspective: 0/none 無3D空間

perspective: 越小,3D越明顯,即眼晴越靠近真3D

perspective: 無窮大,與0/none效果一致

.p3{-webkit-perspective:400px;} //眼晴離顯示器的距離 先寫,避免bug ,值越小視覺越誇張,即視頻越遠
.img3{-webkit-transform: rotateY(0deg);transition:5s all ease; //沿Y軸轉
.img3.hover{-webkit-transform: rotateY(360deg)}
 }


<style>
.p3{-webkit-perspective:400px;}
.img3{width:200px;-webkit-transform: rotateY(0deg);transition:5s all ease;}
.img3:hover{-webkit-transform: rotateY(360deg)}
</style>


transform-style: preserve-3d; 有加與無加的區別

<div1 class="wrap">
    <div class="spin">  //border: 1px dashed orange;
        <div class="rotate">  //border: 5px solid yellow;
            <img src="../img/美女4.png" alt="" width="200" />  //border: 1px solid green;
        </div>
    </div>
</div1>

<div class="spin">
    <div class="rotate">
        <img src="../img/美女4.png" alt="" width="200" />
    </div>
</div>


<style>
.wrap {

width: 300px;
height: 200px;
margin: 30px auto;
position: relative;
background-size: 100% 100%;

}
/设置动画/
@keyframes spin{

0%{
    transform:rotateY(0deg)
}
100%{
    transform:rotateY(360deg)
}

}
.spin {

width: 142px;
height: 200px;
position: absolute;
top: 50%;
left: 50%;
margin-left: -72px;
margin-top: -101px;
border: 1px dashed orange;
cursor: pointer;
transform-style: preserve-3d;

}
/调用动画/
.spin:hover{

animation:spin 5s linear infinite;

}
.rotate {

background: url(../img/美女4.png) no-repeat center;
background-size: 100% 100%;
border: 5px solid #EFDF3B;
transform: perspective(200px) rotateY(45deg);

}
.rotate img{

border: 1px solid green;
transform: rotateX(15deg) translateZ(10px);
transform-origin: 0 0 40px;

}
/改变transform-style的默认值/
.three-d {

transform-style: preserve-3d;

}
</style>
加transform-style: preserve-3d;之後加class="rotate three-d"

<div class="spin">
    <div class="rotate three-d">
        <img src="../img/美女4.png" alt="" width="200" />
    </div>
</div>


-webkit-transform:translateX(0px);位移


<style>
.p4{-webkit-perspective:400px;}
.img4{width:200px;-webkit-transform: translateX(0);transition:3s all ease;}
.img4:hover{-webkit-transform: translateX(200px)}
</style>
-webkit-transform: translateY(0)類似
-webkit-transform:translateZ(0px);位移,Z軸相當於垂直電腦屏幕,電腦屏幕打個釘子;
數值越大離得越近,近大遠小原則;

.p5{-webkit-perspective:400px;}
.img5{width:200px;-webkit-transform: translateZ(0);transition:3s all ease;}
.img5:hover{-webkit-transform: translateZ(200px)}


<style>
.p5{-webkit-perspective:400px;}
.img5{width:200px;-webkit-transform: translateZ(0);transition:3s all ease;}
.img5:hover{-webkit-transform: translateZ(200px)}
</style>


理解perspective-origin,默認值:perspective-origin:50% 50%,如 perspective-origin:top left表示眼睛在文體元素的左上角看元素,下面的圖解析
</p
1、

http://codepen.io/HugoGiraudel/pen/jpnsH


2、

http://codepen.io/HugoGiraudel/pen/dhBlC


animation @keyframes


animation-name: 動畫默認none;

animation-duration:動畫持續時間;

animation-timing-function:動畫過度類型

linear:線性<br />
ease:平滑<br />
ease-in:由慢到快<br />
ease-out:由快到慢<br />
ease-in-out:由慢到快再到慢<br />
cubic-bezier(number, number, number, number):特定的贝塞尔曲线类型,number 在 [0, 1] 区间内取值<br />

animation-delay:動畫延遲時間

animation-iteration-count:動畫循環次數,正整數或 infinite 無限循環,默認 1

animation-direction:循環中是否執行往返運動,normal正向,alternate 交替 默認normal

animation-play-state:動畫狀態,默認running,如paused暫停,不建議使用

以上这些参数都可以同时赋予多个值,只要注意各参数顺序对应即可


最簡單例子:

#demo1{
animation-name:move;    /*必須*/
animation-duration:3s;  /*必須*/  
animation-iteration-count:1
}
@-webkit-keyframes move {    /*必須*/  
  from { left:0 }
  to { left:500px }
}


<style>

demo1{width: 99px;height: 99px;background: #467B96;position: relative; animation-name:move;animation-duration:3s;animation-iteration-count:1}

@-webkit-keyframes move {
from { left:0 }
to { left:500px }
}
</style>

#demo {
    animation-name: animation1, animation2;    /* 指定动画名称 */
    animation-duration: 2s 1s;    /* 指定动画时长 */
}

以上同時獲得兩個動畫事件,具體過程由@keyframes指定

#demo {
    animation-name: animation1;
    animation-duration: 2s;
    animation-timing-function: linear; 
}
@keyframes animation1{
    from{opacity: 0; }
    to{opacity: 1; }
}

一個超贊的效果:

<h1>hi,man</h1>

<style>
.circle{background:#fff;border-radius:100%;cursor:pointer;position:relative;margin:0 auto;width:15em;height:15em;overflow:hidden;-webkit-transform:translateZ(0);-moz-transform:translateZ(0);-ms-transform:translateZ(0);transform:translateZ(0)}.circle h1{color:rgba(189,185,199,0);font-family:Lato,sans-serif;font-weight:900;font-size:1.6em;line-height:8.2em;text-align:center;text-transform:uppercase;-webkit-font-smoothing:antialiased;-webkit-user-select:none;-moz-user-select:none;-ms-user-select:none;user-select:none;-webkit-transition:color .8s ease-in-out;-moz-transition:color .8s ease-in-out;-ms-transition:color .8s ease-in-out;transition:color .8s ease-in-out}.circle:after,.circle:before{border-radius:100%;content:"";position:absolute;top:0;left:0;width:inherit;height:inherit;box-shadow:inset 10.6em 0 0 rgba(30,140,209,.2),inset 0 10.6em 0 rgba(30,140,209,.2),inset -10.6em 0 0 rgba(30,140,209,.2),inset 0 -10.6em 0 rgba(30,140,209,.2);-webkit-transition:box-shadow .75s;-moz-transition:box-shadow .75s;-ms-transition:box-shadow .75s;transition:box-shadow .75s}.circle:after{-webkit-transform:rotate(45deg);-moz-transform:rotate(45deg);transform:rotate(45deg)}.circle:hover:after,.circle:hover:before{box-shadow:inset .86em 0 0 rgba(255,0,0,.5),inset 0 .86em 0 rgba(252,150,0,.5),inset -.86em 0 0 rgba(0,255,0,.5),inset 0 -.86em 0 rgba(0,150,255,.5)}.circle:hover>h1{color:rgba(185,185,185,1)}
</style>

css3條紋背景

 background-color: #313131;
    background-image: -webkit-gradient(linear, 0 0, 100% 100%,
    color-stop(.25, rgba(255, 255, 255, .2)), color-stop(.25, transparent),
    color-stop(.5, transparent), color-stop(.5, rgba(255, 255, 255, .2)),
    color-stop(.75, rgba(255, 255, 255, .2)), color-stop(.75, transparent),
    to(transparent));
    background-image: -moz-linear-gradient(-45deg, rgba(255, 255, 255, .2) 25%, transparent 25%,
    transparent 50%, rgba(255, 255, 255, .2) 50%, rgba(255, 255, 255, .2) 75%,
    transparent 75%, transparent);
    background-image: -o-linear-gradient(-45deg, rgba(255, 255, 255, .2) 25%, transparent 25%,
    transparent 50%, rgba(255, 255, 255, .2) 50%, rgba(255, 255, 255, .2) 75%,
    transparent 75%, transparent);
    background-image: linear-gradient(-45deg, rgba(255, 255, 255, .2) 25%, transparent 25%,
    transparent 50%, rgba(255, 255, 255, .2) 50%, rgba(255, 255, 255, .2) 75%,
    transparent 75%, transparent);

    -webkit-background-size: 4px 4px;
    -moz-background-size: 4px 4px;
    background-size: 4px 4px; /* 控制条纹的大小 */